ThingsBoard (IoT Platform)
Introduction
ThingsBoard is an open-source IoT platform for data collection, processing, visualization, and device management.
Capabilities
- Define devices and assets as well as relationships between them
- "Collect and visualize data from devices and assets". (ThingsBoard Authors)
- "Analyze incoming telemetry and trigger alarms with complex event processing". (ThingsBoard Authors 2023)
Components
Devices
A device is an abstract component that records and transmits the telemetry of data. Devices are always contained in assets. The name of a device can be chosen arbitrarily because it's only a label. However, the name should reflect what type of data the device will process (temperature, humidity, precipitation, etc.).
Add New Device
To add a new device, select Devices from the ThingsBoard navigation menu on
the left-hand side of the dashboard, i.e. the control panel.
Then, select the plus sign + in the top right corner of the control panel and
select Add new device.
Next, name the device and label it based on the data it will processing.
Then, select Add in the bottom right corner to finish adding the device.
Assets
An asset is an abstract entity that may be related to other assets or devices. You can think of an asset as a container of devices. Each device will send data to and from the asset. The name of an asset can be chosen arbitrarily because it is only a label. For example, you can set up a new asset titled “Building A” that may be related to various devices, such as thermometers or other types of sensors.
To add a new asset, select “assets” on
the ThingsBoard navigation menu on the left-hand side.
Then, select the plus sign (+) in the top-right corner and select Add new asset.
Next, name the asset and assign the asset type to
accurately describe the asset.
Then select Add on the bottom right corner of the dialog window to
finish adding the asset.
Rule Engine
The "ThingsBoard Rule Engine is a highly customizatble and configurable system for complex event processing" (ThingsBoard Authors 2022). The Rule Engine enables users to filter and transform incoming messages originated by your devices and related assets.
The Rule Engine is composed of rule nodes and rule node relations. Rule nodes process an input message and produce an output. Rule node relations are used to connect rule nodes.
Root Rule Chain
A rule chain is a logical group of rule nodes and their relations (ThingsBoard Authors 2022). The Root Rule Chain is responsible for ingesting data, handling all incoming messages, and forwarding the messages to other rule chains for additional processing. For example, the Root Rule Chain may handle incoming temperatures and forward them to an alarm rule chain, which is responsible for sending a notification whenever the temperature gets too high.
Deploy ThingsBoard
Containers
One of the most convenient ways to install, configure and run ThingsBoard is with a Software Container. Below is an example using Docker with a compose file.
version: "2.2"
services:
  thingsboard:
    restart: always
    image: "thingsboard/tb-postgres"
    ports:
      - "8080:9090"
      - "9883:1883"
      - "5683:5683/udp"
    environment:
      TB_QUEUE_TYPE: in-memory
    volumes:
      - ./data:/data
      - ./logs:/var/log/thingsboard
To summarize the configuration:
restart: always: This specifies that the container should always be restarted if it stops.image: "thingsboard/tb-postgres": This specifies the Docker image to use for the container.ports: This specifies the ports to expose on the host machine."8080:9090": This maps port 9090 in the container toport 8080 on the host machine."9883:1883": This maps port 1883 in the container to port 9883 on the host machine."5683:5683/udp": This maps port 5683/udp in the container to port 5683/udp on the host machine.
environment: This specifies environment variables to set in the container.TB_QUEUE_TYPE:in-memory: This sets theTB_QUEUE_TYPEenvironment variable to in-memory.
volumes: This specifies directories to mount as volumes in the container../data:/data: This mounts the./datadirectory on the host machine as/datain the container../logs:/var/log/thingsboard: This mounts the./logsdirectory on the host machine as/var/log/thingsboardin the container.
Now to spin up the service, simply type this command:
docker-compose upTo login, the default login is sysadmin@thingsboard.org,
the default password is sysadmin.
For more info on the demo users,
see the ThingsBoard Documentation on Demo Users.
Alarms
Imagine an IoT device, such as a thermostat, that sends temperature data to ThingsBoard. Ideally, you would like to monitor your data so that if the temperature gets too high or low, a notification is sent. To achieve this, ThingsBoard provides the option to set alarms to monitor data and notify users or clients when the data reaches a certain threshold.
Create Alarms
The easiest way to create an alarm in ThingsBoard is by
creating a custom rule chain that is able to trigger or clear alarms based on data.
To set up an alarm rule chain, navigate to Rule chains on
the left menu of the ThingsBoard home page.
Add a new rule by selecting the plus (+) icon in the top-right and
selecting Create new rule chain.

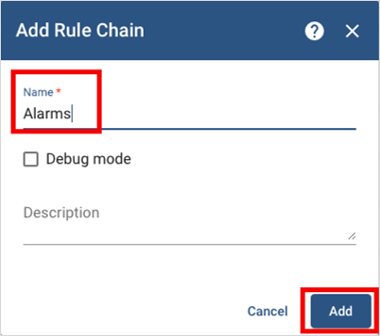
Name this rule chain Alarms, then select Add on the bottom right of
the dialog window opened for adding the Rule Chain.
Open the Alarms rule chain.
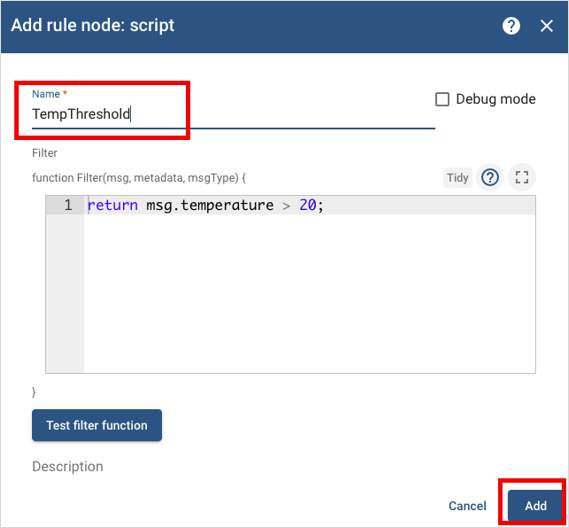
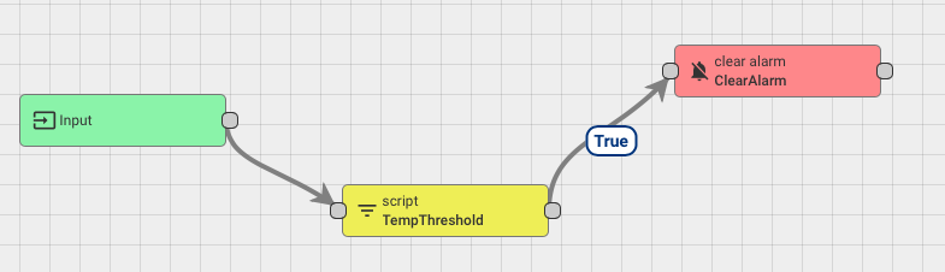
Add a script node and name it TempThreshold.
Notice this node allows to modify or add Javascript code to
trigger the alarm when data reaches a certain value.
The default value triggers the alarm when the temperature is greater than 20.
This value can be modified as needed.
Select Add to add the TempThreshold node to the Rule Engine.
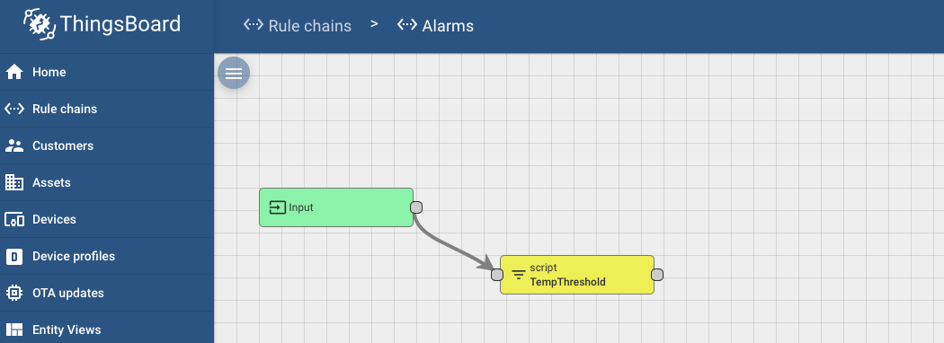
The rule chain will come with an Input node automatically set up.
Connect the Input and the TempThreshold nodes.
This will allow the Alarms rule chain to receive input data from devices.
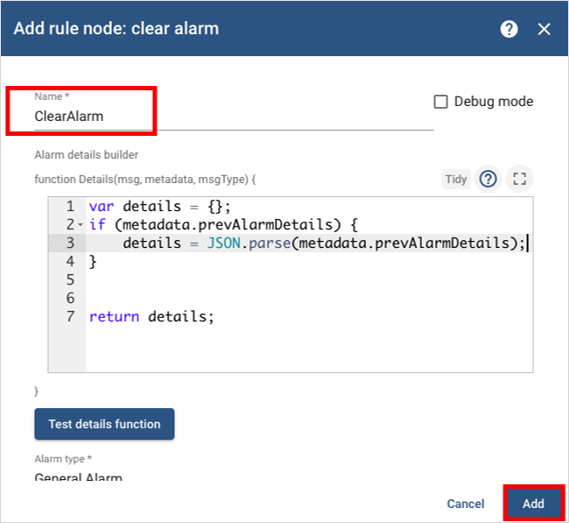
Add a clear alarm node and name it ClearAlarm.
Modify the default Javascript code:
var details  = {};
if (metadata.prevAlarmDetails) {
  details = JSON.parse(metadata.prevAlarmDetails);
} return details;
Select Add to add the ClearAlarm node to your Rule Engine.
Connect the TempThreshold & ClearAlarm nodes * add True as the link label.
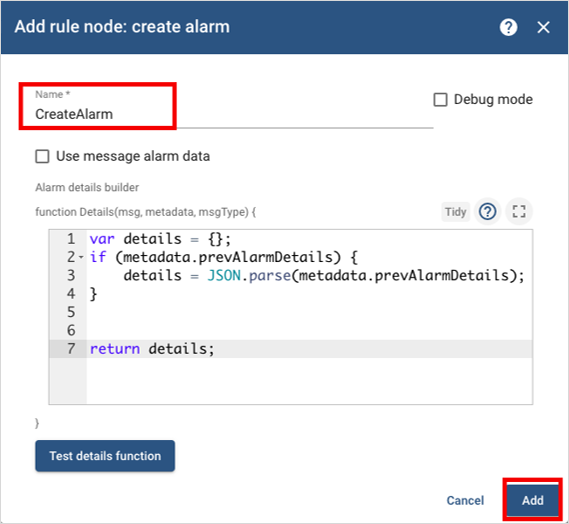
Add a create alarm node and name it CreateAlarm.
Modify the default Javascript code:
var details = {};
if (metadata.prevAlarmDetails) {
  details = JSON.parse(metadata.prevAlarmDetails);
} return details;
Select Add to add the CreateAlarm node to the rule Engine
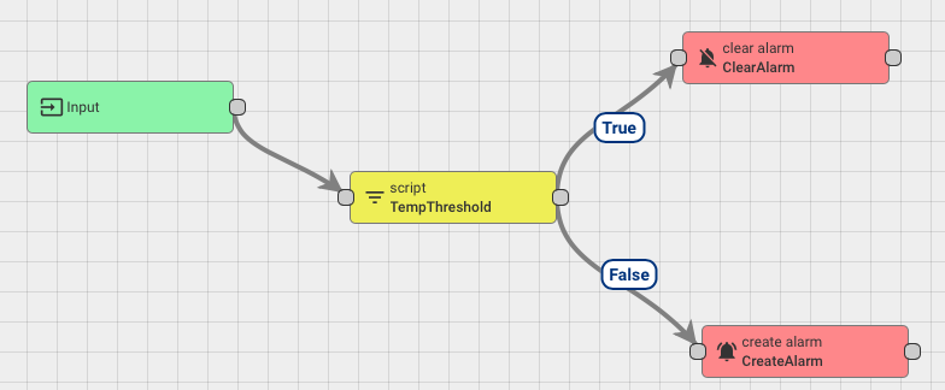
Connect the TempThreshold and CreateAlarm nodes,
and add False as the link label.
Now the rule chain this has created is ready to be added to the Root Rule Chain.
Crucially it should be done using the typical Save Timeseries,
followed by this newly added alarm chain.
References
Web Links
- ThingsBoard Authors. "ThingsBoard". thingsboard.io. June 29 2023
- The ThingsBoard Authors. "What is ThingsBoard?" Community Edition: ThingsBoard Documentation. 2022
- The ThingsBoard Authors. "Rule Engine Overview". Community Edition: ThingsBoard Documentation. 2022
- The ThingsBoard Authors. "Demo Account". Community Edition: ThingsBoard Documentation. 2022