PCDE Project 23.1: Creating a Sense-Making Data Pipeline
Introduction
In this project, you will use the Python urllib library to pull data from MIT’s course catalog. The data being pulled from the web will be unstructured, so you will have to clean it first to extract the course names. Once the course names are extracted and the data is structured, you will perform some data analysis to learn how many times each word occurs throughout all of the course names. This analysis will be saved as a JSON file, which will then be referenced by your D3 web application. Lastly, the web application will generate a visual analysis of the JSON data that you just collected.
To streamline the data analysis process, you will use software tools that you have learned about in previous modules, such as Docker and Airflow. You will be responsible for instantiating an Airflow web server within a Docker container to handle each Python task that you define. These tasks will divide the project into smaller, more manageable pieces. In the end, you will experiment with different D3 libraries to customize your project.
As you write the code for this project, it is strongly recommended that you run each method independently as it is created so that you can verify that each task works as expected.
This project is worth a total of 100 points.
Instructions
Part 1: Code Development
Step 1
Create a folder titled project-23.
Place the code visualization folder within
the project-23 folder, and create another empty folder titled airflow-docker.
Then, create a new assignment.py file,
which will contain your coding throughout the project.
Provide a screenshot of the project-23 folder with
the code visualization folder, airflow-docker folder,
and assignment.py file within it.
Step 2
Open the assignment.py file using VS Code.
First, you will need to import all of the libraries that you will be using.
Import the following libraries:
- The DAG object (needed to instantiate a DAG)
- From
airflow, importDAG. - From
datetime, importtimedelta.
- From
- Operators (needed to operate)
- From
airflow.operators.bash, importBashOperator. - From
airflow.utils.dates, importdays_ago. - From
airflow.operators.python, importPythonOperator.
- From
- Task Functions (used to facilitate tasks)
- Import
urllib.request. - Import
time. - Import
glob,os. - Import
json.
- Import
Provide a screenshot to show that you have imported the DAG object, the operators, and all of the necessary task functions into the assignment.py file.
Step 3
Generate your first task.
This task will be a Python function named catalog() that accepts no arguments.
Inside of the catalog() function,
define two helper functions named pull(url) and store(data, file).
The pull(url) function accepts, as an argument, a URL of type string.
This function will execute the code provided in lines 6 and 7 in
the code_starter/01_pull.py file and
will return the data variable.
The store(data, file) function accepts two arguments:
a filename of type string and the data that was returned by the pull() function.
The store() method will execute the following:
- Create and open a file named after the URL where the data came from
(example:
m1a.html). - Write the data to the file.
- Close the file.
Below, you are provided with the pseudocode to define the catalog() function and
the pull(url) and store(data, file) helper functions.
Note: This is just pseudocode;
you will need to complete it with the correct syntax:
# pull course catalog pages
def catalog():

    #define pull(url) helper function
    def pull(url):

        return data

    #define store(data,file) helper function
    def store(data,file):

        print('wrote file: ' + file)
Provide a screenshot of the pull(url) and
store(data, file) helper functions defined inside of the catalog() task.
Step 4
Once you have defined these two helper functions,
you need to write some code within
the catalog() method to utilize them.
Create a list titled urls that contains the working URLs in
the 00_urls.txt file as strings.
Use a for loop to iterate through the urls list.
First, the loop will call the pull(url) function to obtain the data.
Then, the loop will call the store(data, file) function to obtain the data.
Use the pseudocode provided below to define the for loop.
Note: This is just pseudocode; you will need to complete it with correct syntax.
index = url.rfind('/') + 1
#call pull function

file = url[index:]
#call store function

print('pulled: ' + file)
print('--- waiting ---')
time.sleep(15)
Provide a screenshot of the entire catalog() function,
including the urls list and the for loop just implemented.
Step 5
Continue coding within the assignment.py file.
Create the second task in the Airflow pipeline called combine().
The combine() task will combine all of the unstructured data files into
one large file.
Use the pseudocode below to combine the files.
Note: This is just pseudocode;
you will need to complete it with the correct syntax:
open('combo.txt') as outfile:
       for file in glob.glob("*.html"):
           open(file) as infile:
               outfile.write(infile.read())
Provide a screenshot of the combine() method with
the correct code to combine the files.
Step 6
Continue coding within the assignment.py file.
Create the third task method, called titles().
This function will utilize the BeautifulSoup4 library,
which enables you to scrape web pages.
The titles() function will take no arguments.
This function imports the BeautifulSoup4 library and contains one helper function,
store_json(), to store the resulting JSON file.
Copy the code below under the definition of the titles() function to
import the BeautifulSoup4 library and define the store_json() function.
from bs4 import BeautifulSoup
def store_json(data,file):
       with open(file, 'w', encoding='utf-8') as f:
           json.dump(data, f, ensure_ascii=False, indent=4)
           print('wrote file: ' + file)
Next, you will use the BeautifulSoup4 library to inspect the HTML page and
gather the information within the h3 element of the page where
the course titles are found.
You will then place the result in a JSON file.
Complete the pseudocode for the titles() function below to open and
read the HTML file generated by the combine() function.
def titles():
      from bs4 import BeautifulSoup
      def store_json(data,file):
           with open(file, 'w', encoding='utf-8') as f:
               json.dump(data, f, ensure_ascii=False, indent=4)
               print('wrote file: ' + file)

   #Open and read the large html file generated by combine()


   #the following replaces new line and carriage return char
   html = html.replace('\n', ' ').replace('\r', '')
   #the following create an html parser
   soup = BeautifulSoup(html, "html.parser")
   results = soup.find_all('h3')
   titles = []

   # tag inner text
   for item in results:
       titles.append(item.text)
   store_json(titles, 'titles.json')
Provide a screenshot of the completed titles() method with the correct code to
open and read the HTML file generated by the combine() function.
Step 7
Continue coding within the assignment.py file.
The next task method will remove all punctuation, numbers,
and one-character words from the titles.json file.
This task method, clean(), takes no arguments and uses the same helper function,
store_json(data,file), that you used in the title() function defined in
the previous step.
Below is the pseudocode for the clean() method.
Implement any needed commands to complete the pseudocode:
def clean():
   #complete helper function definition below
   def store_json(data,file):
      ..
   with open(titles.json) as file:
       titles = json.load(file)
       # remove punctuation/numbers
       for index, title in enumerate(titles):
           punctuation= '''!()-[]{};:'"\,<>./?@#$%^&*_~1234567890'''
           translationTable= str.maketrans("","",punctuation)
           clean = title.translate(translationTable)
           titles[index] = clean

       # remove one character words
       for index, title in enumerate(titles):
           clean = ' '.join( [word for word in title.split() if len(word)>1] )
           titles[index] = clean

       store_json(titles, 'titles_clean.json')
Provide a screenshot of the fully implemented clean() method with
the correct code to remove all punctuation, numbers,
and one-character words from the titles.json file.
Step 8
Continue coding within the assignment.py file.
The final task method you will define is count_words().
The count_words() method accepts no arguments and
uses the helper function store_json(data,file) that
was used in the previous two tasks to save the resulting JSON file.
The pseudocode for the count_words() method is below.
Implement any needed commands to complete the pseudocode:
def count_words():
     from collections import Counter
     def store_json(data,file):
           ..
     with open(titles_clean.json) as file:
            titles = json.load(file)
            words = []

            # extract words and flatten
            for title in titles:
                words.extend(title.split())

            # count word frequency
            counts = Counter(words)
            store_json(counts, 'words.json')
Provide a screenshot of the completed count_words() method with
the correct code to call the store_json(data,file) helper function.
Step 9
Continue coding within the assignment.py file.
Because this Python file will be run using Airflow,
you need to design an Airflow pipeline as the final part to this file.
The first step is to define the DAG.
Then, define each task, from t0 to t5, for a total of six tasks.
The first task, t0,
will be a bash command to install the BeautifulSoup4 library within
the Docker environment.
The next five tasks will each call one Python function that you have defined in
the previous steps.
Below, you are provided with some code to get started.
The t0 task is already defined for you.
The t1 task is also already defined for you,
and it executes the catalog() function in your DAG.
Complete the code below to define the remaining four tasks:
with DAG(
   "assignment",
   start_date=days_ago(1),
   schedule_interval="@daily",catchup=False,
) as dag:

# INSTALL BS4 BY HAND THEN CALL FUNCTION

   # ts are tasks
   t0 = BashOperator(
       task_id='task_zero',
       bash_command='pip install beautifulsoup4',
       retries=2
   )
   t1 = PythonOperator(
       task_id='task_one',
       depends_on_past=False,
       python_callable=catalog
   )
   #define tasks from t2 to t5 below


   t0>>t1>>t2>>t3>>t4>>t5
Provide a screenshot of the DAG declaration with all six tasks,
from t0 to t5, correctly defined.
Part 2: Code Execution
Step 10
Execute the command below in a Terminal window to
copy the assignment.py file inside the airflow-docker/dags folder so
that Airflow can load the Python tasks as a DAG.
cp assignment.py airflow-docker/dagsNext, make sure that your Docker application is open. To speed up your computations, select the gear icon on the top right corner of your Docker UI.

Select the Resources option in the menu on the left and increase the CPU and memory to the maximum value possible.
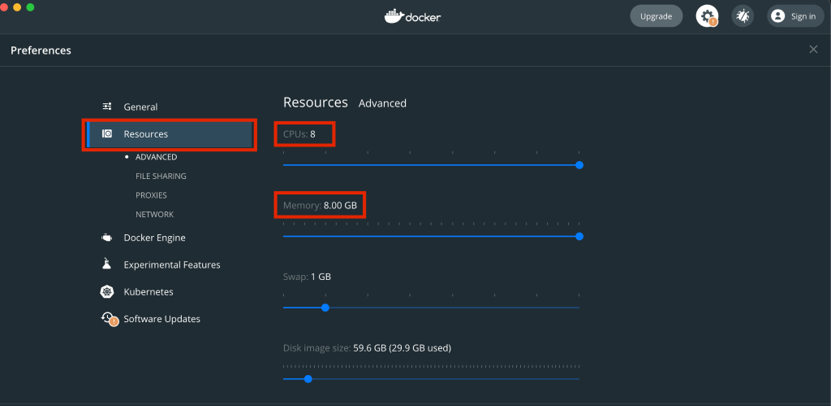
Select Apply and Restart to finalize your changes.
You are now ready to run the Airflow pipeline.
In a Terminal window, navigate to the airflow-docker folder that
you created within the project-23 folder.
Follow the first four steps in Mini-Lesson 19.2 to
install Airflow on your machine and to initialize the containers.
Provide a screenshot of your Docker application that shows that your Airflow Docker container has initiated.
Step 11
Navigate to http://localhost:8080/ to see your Airflow session.
Access Airflow by entering “airflow” for both the username and password.
Select Sign In. Select the assignment.py DAG and switch to the Graph View.
Select each task and then select Run.
Once the DAG has finished running,
provide a screenshot of the task boxes to show that the DAG ran successfully.
Step 12
The files generated by your DAG that you will need for
the final steps of the assignment are located on the worker_1 airflow server.
To verify this, in a new Terminal window,
use the following bash command to enter the server:
docker exec -it airflow_docker_airflow-worker_1 /bin/bashUse the ls bash command to list the files inside of your container.
If your DAG was successful, you will see a words.json file,
which you will be using to visualize word frequency.
In a new local Terminal window (not the server),
run the command below to transfer the words.json file to your local machine.
You will have to edit this command to include the path to
your project-23/code_visualization folder.
docker cp airflow_docker_airflow-worker_1:/opt/airflow/words.json YOUR_PATH_HEREThere is a small difference between the .json file that you just created and
the .js file needed to visualize the code.
Place the data from the words.json file into the words.js file within
the code_visualization folder.
Provide a screenshot of the words.js file with the data from
the words.json file.
You may not be able to fit all the data in one screenshot.
If so, the first part of the file is sufficient.
Step 13
Next, run the JavaScript visualization code by placing the direct path to
the mitcourses_graph.html file in your web browser.
Ex: Navigate to
file:///YOUR_PATH_HERE/project-23/code_visualization/mitcourses_graph.html in
your web browser.
Provide a screenshot of the visualization produced with
the mitcourses_graph.html file in your web browser.
Step 14
Enhance the bubble chart produced in the previous step by
using the D3 library and the example code provided to you in
Mini-Lesson 23.5.
Modify the code in the d3_bubble_chart_example.html file to
display the words saved in the words.json file.
Provide a screenshot of your enhanced visualization created with
the D3 library and the modified example code.
Submission
Submission: Part 1: Code Development
- Provide a screenshot of the
project-23folder with thecode-visualizationfolder,airflow-dockerfolder, andassignment.pyfile within it. - Provide a screenshot to show that you have imported the DAG object,
the operators, and all of the necessary task functions into
the
assignment.pyfile. - Provide a screenshot of the
pull(url)andstore(data, file)helper functions defined inside of thecatalog()task. - Provide a screenshot of the entire
catalog()function, including theurlslist and theforloop that you just implemented. - Provide a screenshot of the
combine()method with the correct code to combine the files. - Provide a screenshot of the completed
titles()method with the correct code to open and read the HTML file generated by thecombine()function. - Provide a screenshot of the fully implemented
clean()methodwith the correct code to remove all punctuation, numbers, and one-character words from thetitles.jsonfile. - Provide a screenshot of the completed
count_words()method with the correct code to call thestore_json(data,file)helper function. - Provide a screenshot of the DAG declaration with all six tasks,
from
t0tot5, correctly defined.
Submission: Part 2: Code Execution
- Provide a screenshot of your Docker application that shows that your Airflow Docker container has initiated.
- Provide a screenshot of the task boxes to show that the DAG ran successfully.
- Provide a screenshot of the
words.jsfile with the data from thewords.jsonfile. You may not be able to fit all the data in one screenshot. If so, the first part of the file is sufficient. - Provide a screenshot of the visualization produced with
the
mitcourses_graph.htmlfile in your web browser. - Provide a screenshot of your enhanced visualization created with the D3 library and the modified example code.
References
Web Links
- PCDE Course Project 23-1 Visualization Code Download
- Project 23 Download: code_starter/01_pull.py
- Project 23 Download: 00_urls.txt
- BeautifulSoup4 Quick-start guide
TODO: Once the pastebin service is up and running, place this code (which will be in the PCDE archive) into it and change the link to the bin
TODO: This link above currently links to the emeritus mini lesson 19.2, it needs to link to the airflow note section on docker deploys or the separate note made for airflow installs.