Apache NiFi
Introduction
According to Wikipedia:
Apache NiFi is a software project from the Apache Software Foundation designed to automate the flow of data between software systems. Leveraging the concept of extract, transform, load (ETL), it is based on the "NiagaraFiles" software previously developed by the US National Security Agency (NSA), which is also the source of a part of its present name – NiFi.
History of Apache NiFi
NiFi was initially developed by the National Security Agency (NSA) in 2006 and was used by the organization for ETL for eight years. In 2014, it was donated to the Apache Software Foundation and, in 2015, NiFi became an official part of the Apache Project Suite. Since the, NiFi has been continually updated and improved and every six to eight weeks, Apache NiFi releases a new version. When using NiFi, it is important to ensure that you are using the most recent version.
Features of NiFi
When it comes to features, it's pretty good at handling pipelines when it comes to going between systems. It has a friendly user interface. It is modeled around processors. You can think of processors as transformers. It's also really scalable, simply add more commodity machines in parallel.
Pros and Cons
Pros
- It's open source.
- It can transfer data or map to different systems.
- When doing ETL this is important because as you're extracting data, you can send data to the right endpoints to act on it.
- It can deliver data to many kinds of analytic systems.
- You can enrich and prepare for subsequent steps.
- It is scalable
Cons
- It is not a distributed computation platform
- It is not for complex event processing with complicated event sequencing logic.
- It is not for doing aggregate operations on large volumes of data.
- You're better off doing this on larger data-warehouse or distributed database systems.
Three Concepts of NiFi
FlowFile
It's the data itself contained within NiFi's pipeline format. It contains the data itself. It also contains attributes that are associated with the data, such as metadata or key-value pair structures that are associated.
Processor
The processor is the name for the parts of the system doing ETL transforms.
It applies to FlowFiles.
Every transformation creates a new output from the transformation.
So you can pair these up and you can take a processor that
outputs feeds into the next processor,
layering the transforms.
Between each processor is a FlowFile of the intermediary till
you get to the final output.
Connector
A connector can be thought of as a queue for the FlowFiles waiting to
be processed by the processor.
The advantage there is you can create a priority queue.
Even with rules like FIFO or LIFO.
You can also have some back pressure.
For example, you can limit it to 10k FlowFiles in the queue and
stopping the queue until you've processed more of them and
limit the data flow.
Key Components of NiFi
These key components add to the list of concepts that must be known to understand the functioning and configuring of NiFi.
- Connector: A connector links processors together and
defines the relationship between the processors, which controls how data flows.
- Connectors can also link one processor back to itself to create a loop.
- Controller: A controller records connections between processes and controls the allocation of threads used by all processes (Taylor 2021).
- Event: Events represent the change to a
FlowFilewhile traversing through a NiFi flow. These events are tracked in NiFi repositories. - Flow: The NiFi flow is a process
that begins once all the processors are connected and running.
- During the process, data is updated, inserted, or deleted in a database.
FlowFile: AFlowFileis "original data with meta-information attached to it. It allows you to process not only CSV or other record-based data but also pictures, videos, audio or other binary data.- Process Group: A process group is composed of all of the processors and
their related connectors.
- It includes the exchange of data that occurs between these entities through the use of ports.
- Processor: A processor is "the NiFi component that
is responsible for creating, sending, receiving, transforming, routing,
splitting, merging, and processing
FlowFiles. It is the most important building block available to NiFi users to build their data flows" (Apache Software Foundation 2018). - Server: The NiFi UI and running processes are hosted on a server.
There are many different components to the NiFi architecture. To learn more about the key components, reference Apache NiFi Overview.
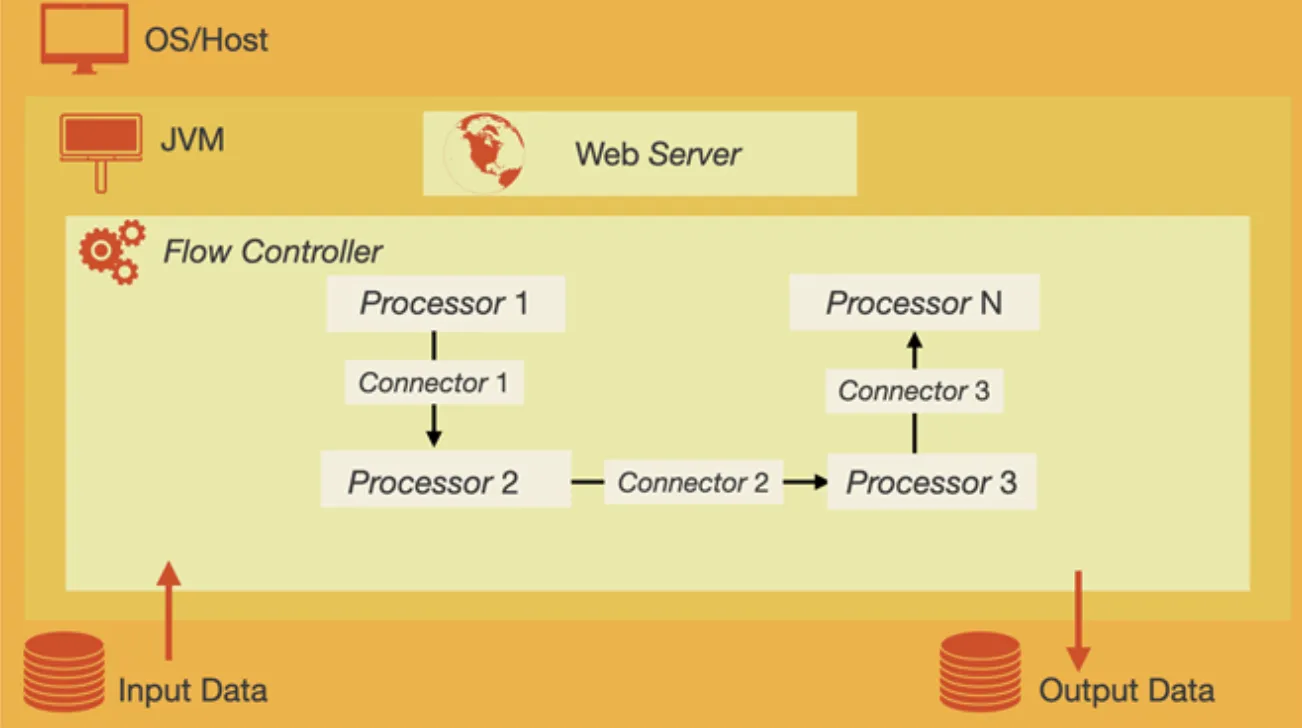
NiFi Architecture
NiFi has a well-thought-out architecture.
Once data is fetched from external sources or your local machine,
if is represented as a FlowFile inside the NiFi architecture.
Next, a flow controller must be created to configure your flow.
At this stage,
you will need to add different controllers depending on
the type of database you are working with.
After that, you must add a number of
single-function components (in NiFi, these are called processors) that
can be utilized to build out a customized NiFi data flow.
Finally, in order to start the data flow to perform ETL,
you must connect your processors using connectors.
Below is a diagram that should explain how these architectures work.
Why Use NiFi?
There are a number of reasons to use Nifi.
NiFi allows you to import data into NiFi from
numerous data sources and create FlowFiles to
integrate that data into your data flow process.
NiFi is user-friendly and customizable;
you can edit your data in real time,
manage your data flows, and integrate NiFi into your existing infrastructure
(Taylor 2021).
NiFi is a popular tool because it is equipped with a number of useful features. Key features of NiFi are described in the following table:
- Continuous Improvement
- NiFi is updated frequently, ensuring users have access to the most up-to-date systems and features.
- NiFi also runs quickly to allow for fast processing, testing and communication of data.
- Customizable
- NiFi gives the power to the user to create a data flow that works best for them.
- Users can set up the processors, connectors, and controllers that they need to build an effective flow for their data.
- NiFi uses single-function components that can be built and added on to make data flows as simple or complex as the user needs them to be.
- Role-Based Security Features
- NiFi uses role-based authentication and authorization protocols to ensure the security of data (Taylor 2021).
- Data also flows through secure methods that encrypt communication to prevent data insecurity.
- Support
- NiFi offers helpful online guides and technical support for users to help with troubleshooting issues and optimizing data flows.
- User-Friendly
- NiFi uses the Java programming language.
- Commonly known language & allows for easy transfer of data from any system to NiFi.
- NiFi is also easily accessed, even from places with limited connectivity.
For more information read the top-level NiFi documentation overview.
Deploy NiFi in a Container
One of the most common ways to deploy NiFi is through the use of software container runtimes, particularly Docker.
Create the Container Network
Firstly, a container network is required,
like using the docker network set of sub-commands.
A container network is necessary because NiFi needs to work with other containers,
when running it as a container.
This is to run with other containers like the databases that can also be containerized.
To create the container network, run the following command:
docker network create nifiCreate the NiFi Container
Next, create the NiFi container. We'll define an example using Docker below:
docker run \
      --name nifi \
      --network nifi \
      --publish 8080:8080 \
      --env NIFI_WEB_HTTP_PORT=8080 \
      --detach apache/nifi:latest
These parameters are:
--name nifi: The name of the container isnifi.--network nifi: The container is connected to thenificontainer network.-p 11111:8080: The container is mapped to external port11111to8080.-e NIFI_WEB_HTTP_PORT=8080: The NiFi web HTTP port is8080.- NOTE this seems required in latest versions of NiFi.
- Otherwise, the NiFi web UI will not be accessible.
-e NIFI_WEB_HTTP_HOST=0.0.0.0: The NiFi web HTTP host is the local host.- NOTE same as above.
--detach: The container is detached from the terminal.- It will run in the background and we'll interact with it later.
apache/nifi:latest: The container image to use isapache/nifi:latest.- Remember, it's particularly important in NiFi to keep up to date.
Now you should be able to navigate a browser to http://localhost:8080/nifi.
There you should see the UI for NiFi.
A database will also be required in some fashion to run NiFi.
Here mysql:8.0 or MySQL 8.0 is used.
docker run \
    --name mysql \
    --network nifi \
    -p 3306:3306 \
    -e MYSQL_ROOT_PASSWORD=MyNewPass \
    --detach \
    mysql:8.0
These parameters are:
--name mysql: The name of the container ismysql.--network nifi: The container is connected to thenificontainer network.-p 3306:3306: The container is mapped to external port3306to3306.-e MYSQL_ROOT_PASSWORD=MyNewPass: The root password is set toMyNewPass.--detach: The container is detached from the terminal.- It will run in the background and we'll interact with it later.
mysql:8.0: The container image to use ismysql:8.0.
Initialize a MySQL Database for NiFi ETL
MySQL databases are some of the more common databases to be used with NiFi.
Here we'll initialize a MySQL database for use with NiFi using docker and
some SQL commands.
We'll create an education database with a students table.
To open the MySQL shell on the terminal in the mysql container using this command:
docker exec -it mysql mysql -u root -pMyNewPassThen we'll initialize the education database and
students table using the following SQL commands:
DROP DATABASE IF EXISTS education;
CREATE DATABASE IF NOT EXISTS education;
USE education;

CREATE TABLE `students` (
  `email` varchar(64) NOT NULL,
  `name` varchar(64) NOT NULL,
  `city` varchar(64) NOT NULL,
  PRIMARY KEY (`email`)
);

INSERT INTO `students` VALUES('peter@mit.edu','Peter Parker','Cambridge,MA');
This then creates the education database and students table.
The students table has three columns: email, name, and city.
Finally, a single row is inserted into the students table.
Add a MySQL Driver to NiFi
To make NiFi work with MySQL, we'll need to add a MySQL driver to NiFi. This same process can be used to add other drivers to NiFi as well. This allows NiFi to directly access the database to read and write data.
The driver is a Java archive (JAR) file.
Since NiFi is written in Java,
the driver needs to be a JAR file.
To access the MySQL Java driver,
go to its download page.
Then download the mysql-connector-java-8.0.33.jar file.
NOTE: The version is always going to get updated. Currently the version being used and written about is
8.0.33. Use whatever the latest version is when you see this version string.
For most linux operating systems and containers,
you'll want to select the Platform Independent option.
But you could also download a .deb for Debian-based systems or
a .rpm for Red Hat-based systems as an example.
After you've downloaded the archive and decompress it, find the JAR file and copy it over to the NiFi container. To copy it over to the NiFi container, use the following command:
docker exec -it nifi mkdir -p /opt/nifi/drivers
docker cp mysql-connector-java-8.0.33.jar nifi:/opt/nifi/drivers/
Create an ETL Pipeline in NiFi
To start,
we can start by creating the Database Connection Pool within the NiFi web UI.
To do this,
there should be a view titled Operate with a gear icon representing settings.
Click that and you should be able to configure a NiFi Flow.
Open the Controller Settings tab and
click the + button to add a new controller service.
Then select the DBCPConnectionPool controller service.
Then Add it it.
To configure this controller service, click on the gear icon for
the DBCPConnectionPool controller service.
Then click the Properties tab.
Then click the + button to add a new property.
Then add the following properties:
Name: MySQL- Properties:
Connection URL:jdbc:mysql://mysql:3306/education- The
mysqlis the name of the MySQL container or its hostname.- The hostname docker provides defaults to the name of the container.
- The
educationis the name of the database we created earlier.
- The
Database Driver Class Name:com.mysql.jdbc.Driver- This is the name of the MySQL driver Java class.
Database Driver Location(s):/opt/nifi/drivers/mysql-connector-java-8.0.33.jar- This is the location of the MySQL driver JAR file.
- Same as the location we copied the JAR file to earlier.
Database User:root- The database user to use to connect to the database.
Password:MyNewPass- The password for the database user specified before.
Verify that the configuration looks something like the below screenshot.
Then hit the Apply button to apply the configuration.
Then hit the Enable icon which is a lightning bolt.
Just choose the Service and All Referencing Components option.
Then hit the Apply button to apply the configuration.
The State listed for the DBCPConnectionPool controller service should be Enabled.

Now we can create a Processor to read data from the database.
To add a Processor,
drag a processor block from the top bar of the main NiFi view into the workspace.
As you drop, an Add Processor dialog should appear.
From there you can select the ExecuteSQL processor.
Now we have our first processor.
Add another, LogAttribute and add it to the workspace.
Then connect from the ExecuteSQL processor to the LogAttribute processor.
Only check the For Relationships success checkbox before adding.
Now we'll go ahead and configure the ExecuteSQL processor.
Start off by setting the option to automatically terminate with failure.
Then move to Scheduling and set it to run every 30 sec.
Then move to Properties and set the following properties:
Database Connection Pooling Service:MySQL- This is the name of the controller service we created earlier.
SQL select query:SELECT * FROM education.students- This is the SQL query to run against the database.
- This query selects all rows from the
studentstable.
- This query selects all rows from the
- It's just normal SQL syntax.
- This is the SQL query to run against the database.
Relationshipstab >Auto-terminate relationships:failure- This is the relationship to auto-terminate on.
- This is the relationship we checked earlier.
- This is the relationship that will be used if the query fails.
- This is the relationship to auto-terminate on.
Now if you apply and start the processor you'll see an item in the queue after enabling and starting the processor. It should look something like the below screenshot.
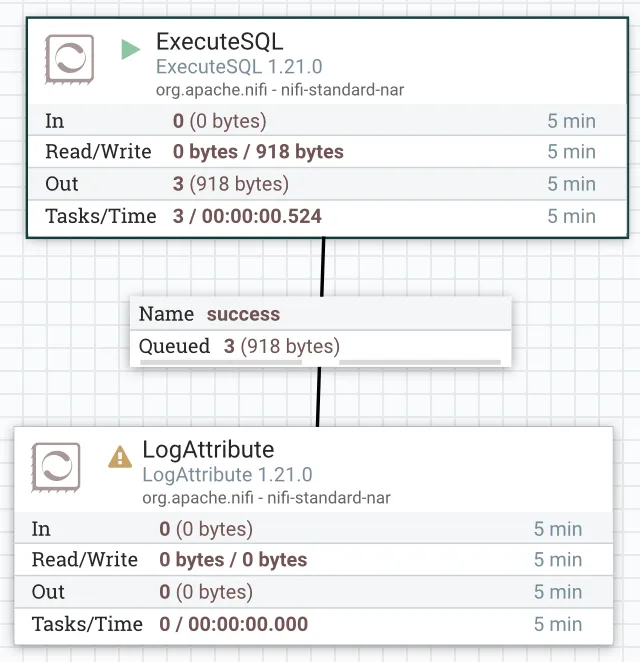
You'll see that the connection has some queued FlowFiles within it.
This is the singular row in the students table.
flowchart LR
    A[Source] -->|Data| B
    B[Processor] -->|Connector FlowFile| C
    C[Processor]
So now we have setup our first basic pipeline as seen in the diagram above. A data source is accessed by a processor. Then the data is connected using a connector to another processor. In that connector a FlowFile is created with all the data we want. Then the next processor deals with or transforms or loads the data within the FlowFile.
References
Web Links
- Apache NiFi (from Wikipedia, the free encyclopedia)
- Apache NiFi Overview
- Apache NiFi Documentation Overview
- Apache Software Foundation NiFi Home
- Taylor, David. "Apache NiFi Tutorial (from guru99.com)
- MySQL Connector/J Download Page